



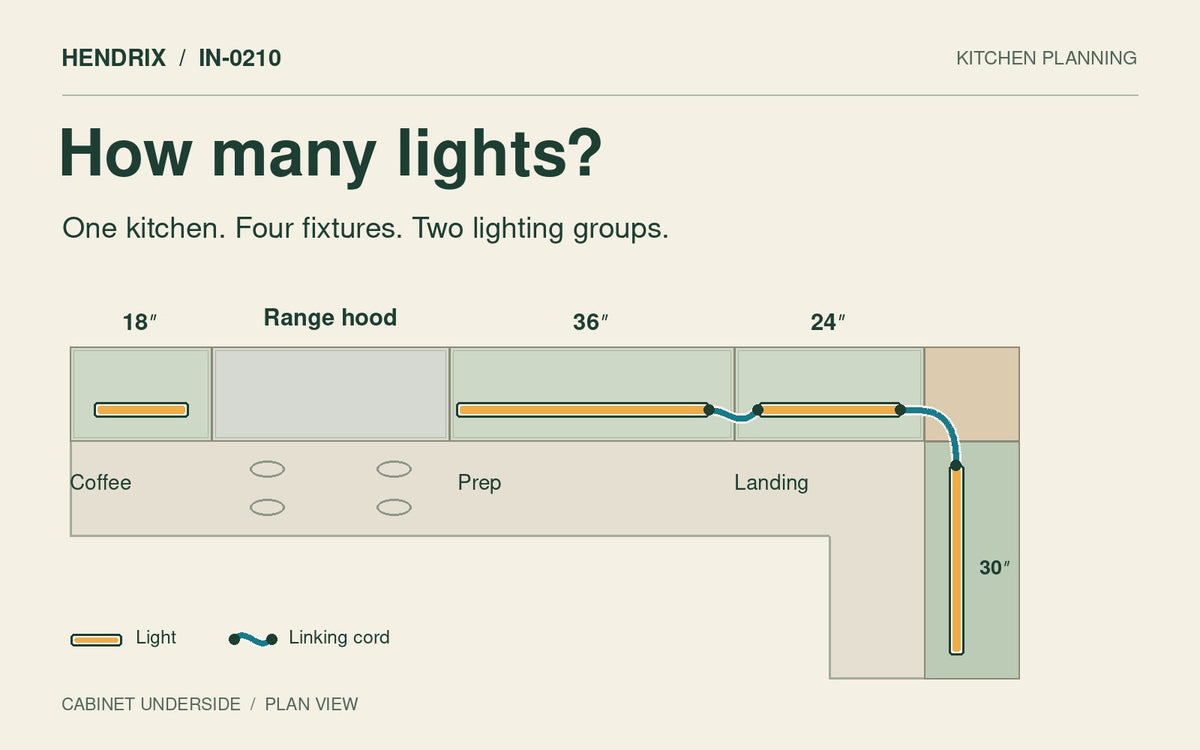
For the L-shaped kitchen in this guide, four lights and two linking cords do the job. Three lights follow the prep counter around the corner. A fourth lights the coffee station on the other side of the range. To find your own count, start with the places you use the counter, then look underneath the cabinets for anything that breaks up the space.
Walk the counter, one cabinet at a time
In this example, the range hood divides the wall into two lighting groups. The cabinet widths below are nominal sizes; the usable space underneath can be smaller.
- Coffee station: 18-inch cabinet → one 12-inch light. This short section has its own power feed. No cord runs across the cooktop.
- Main prep area: 36-inch cabinet → one 32-inch light. The underside is open from end to end, so one long fixture lights the cutting-board area.
- Landing space: 24-inch cabinet → one 18-inch light. A flexible Hendrix linking cord joins this light to the 32-inch prep light.
- Around the corner: 30-inch cabinet → one 24-inch light. The second linking cord turns the corner between the 18-inch and 24-inch fixtures. The fixtures themselves stay straight.
One long light or two short ones?
Look up at the underside of the 36-inch prep cabinet. If it is clear and the plug fits, one 32-inch light is the simpler choice. Now picture a fixed wood brace projecting below the center. The cabinet is still 36 inches wide, but the lamp no longer has one flat place to sit.
In that version, use two 12-inch lights, one on either side. A third linking cord can go around the brace if there is a clear path. That changes the kitchen total to five lights and three linking cords. If the brace blocks the cord as well as the fixture, plan those sections separately.
What to measure before you order
- Measure the flat underside. Check the clear length, depth, and height below the cabinet lip. Note any trim or divider and leave room to reach the light’s switch.
- Trace each cord route. A piece of string works well around a corner: lay it along the path from one fixture port to the next, then measure the string. Allow room for the plugs and the bend.
- Check the kit contents. Count the compatible Hendrix linking cords your layout uses, then compare their lengths with the cords supplied in the kits. Two cords in this example does not necessarily mean two extra cords to buy.
See Hendrix IN-0210 lengths, dimensions, and included accessories
Share:
Replacing Old Under-Cabinet Lights: Xenon & Fluorescent Guide